 Chapter 11, Lesson 3
 Chapter 11, Lesson 3
| |||||||||||||
 |
 |
 |
 |
||||||||||
| 1st |  |
2nd |  |
3rd |  |
4th |  |
||||||
 |
 |
 |
 |
||||||||||
| Pull | Pull | Pull | Pull | ||||||||||
![]()
The first thing we want to point out is the table's caption. To create the caption with a border and it's own background color, we created a "nested" table. This means that we created an entire table (with its own unique background color and border), and then placed it entirely inside the data cell of the first row of the graphic table. We explicitly sized the data cell (which hosts the nested cell), using "cellspanning" to force the data cell to stretch across the entire width of the table (13 columns). Then, to assure that the nested table occupied the entire width of its host's cell, we specified its 'WIDTH' attribute at 100% (meaning 100% of the available width, in this case 100% of the cell width). This technique could as easily be used in conjunction with any image embedded in a table, to provide a bordered caption that seems to be "attached" to the image.
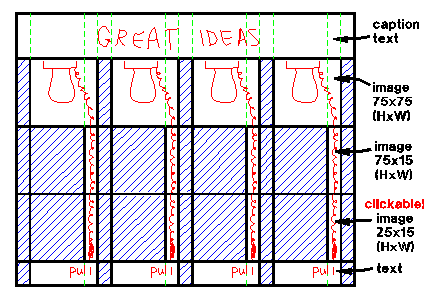
Here's the sketch we used to design this demo:

The basic premise of this example is to demonstrate the use of borderless tables to synthesize a large, clickable graphic. In this case, we want to "point" to 4 different web pages, which the receiving operator can choose if so desired. Rather than create a large image and repeat it 4 times, we decided to piece the images together using very small images (which load very quickly), and depend on table alignment to assure the small images fit together to create the larger image. We therefore created a small image (just 75x75 pixels) for the lightbulb, another smaller image (75x15) for the chain, and yet a smaller image (25x15) for the chain-pull itself. Strung together, they'll form the image of a light socket with a pull-chain. Only the smallest image (the end of the chain) will be "clickable". Clever, huh?
When dealing with complex graphical tables like this one, I find it almost imperative to begin the design with a preliminary hand-drawn sketch. I like to use graphically-ruled paper (remember high-school geometry?), because I can count the squares to keep track of the size of each cell by pixels (height and width). But why go to all this trouble? It may not be apparent at first glance, but by using the pre-design sketch, and carefully laying out the cells in the sketch, we usually end up saving time (and lots of it). You see, the visual cues make the architecture of the table clearer (conceptually), and give us a point of reference if we get confused. Without the sketch, one usually ends up trying to hold the architecture in your head, and most real people find that rather difficult to do. When I take the unwise shortcut and skip the sketch, I usually end up spending tons of time trying to unravel misplaced tags, mis-sized cells, etc, etc, etc. Using a pre-design sketch doesn't guarantee you won't have to "de-bug" your table, but it sure helps out when you do. Let's look at the sketch used for the design shown above:
Here's what the sketch represents:
Once we have our sketch, we can use it to identify how many rows and columns we have in our table. Remember, some of the cells span columns and rows, so we have to be sure to count all the columns or rows (including those hidden by spanning) to come up with our total count. In this example, we see that our table will have 13 columns and 5 rows.
Here's a little hint: when counting columns in rows, make sure every row counts out to the same number of columns (in this example, 13). Of course, when counting the columns, if a cell spans 'x' number of columns, that cell counts as 'x' columns. If every row doesn't count the same, the browser is going to re-size something somewhere to make it come out aligned, and it probably won't look like you expected it to.
In at least one row, it's a good idea to have one cell per column; that is, no column spanning. Some browsers can get confused if each column is not explicitly defined at least once. If you find (from your sketch) that no single row meets this requirement, add one row at the top or bottom of the table, making every cell in that row empty (i.e., nothing between the opening and closing tags), or blank (i.e., using ' '). We don't have to do this with this table, because the third and fourth rows both have the full count of cells/columns (13).
In our example, we want the table to come out exactly right every time. Therefore, we need to make sure every cell is correctly sized, including empty or blank cells, so that the graphic images will align correctly. To do this, we carefully calculate the size of each cell in our sketch, and make sure it's specified in the tables's corresponding data cell. Since we know that the height will be determined by the images we use, and since the height of each image (in a particular row) is uniform, we don't need to specify the height. However, we do need to explicitly specify the width, and to be safe we do it for each cell (although we could have gotten away with specifying fewer cells).
Obviously, it's important that the different images (there are only three) are sized correctly to the cell, and when we create the image in our graphics editor, we'll make sure it matches the cell size where it's intended to reside.
Notice that we've used "blank" cells (using ) for padding the area between the images. By doing so, the cell is guaranteed to take on the background color of the table itself, which is essential for our graphic effect. Even though they're blank cells, we size them explicitly, specifying their 'WIDTH'.
Also notice that the table's border, cellspacing, and cellpadding are all set to zero. By so doing, we assure that the cells will be sized exactly as we specify them, and no "borders" will contribute to the graphic effect.
What results after all of this is a graphic (actually a graphical table) which appears to be a fairly sizable, contiguous image. Yet it loads very quickly, because the three images which comprise it are very small. Additionally, (without resorting to "image-mapping") we've created an interesting clickable image, in which the operator "pulls" the end of the chain to load the desired "idea" web page.
Here's our HTML source code for the demonstration table:
![]()
<TABLE BORDER=0 CELLSPACING=0 CELLPADDING=0>
<TR>
    <TD COLSPAN=13 >
        <TABLE BORDER=5 WIDTH=100% BGCOLOR="FUSCHIA">
           <TR><TD  ALIGN="CENTER" VALIGN="MIDDLE">
            <FONT COLOR="BLUE" SIZE=+2><I>Pull the Chain for Great Ideas!</I></FONT>
            </TD></TR>
        </TABLE>
    </TD></TR>
<TR>
    <TD WIDTH=15> </TD>
    <TD WIDTH=75 COLSPAN=2><IMG SRC="chainlmp.gif"></TD>
    <TD WIDTH=15> </TD>
    <TD WIDTH=75 COLSPAN=2><IMG SRC="chainlmp.gif"></TD>
    <TD WIDTH=15> </TD>
    <TD WIDTH=75 COLSPAN=2><IMG SRC="chainlmp.gif"></TD>
    <TD WIDTH=15> </TD>
    <TD WIDTH=75 COLSPAN=2><IMG SRC="chainlmp.gif"></TD>
    <TD WIDTH=15> </TD></TR>
<TR>
    <TD WIDTH=15> </TD>
    <TD WIDTH=60 ALIGN="CENTER" VALIGN="TOP"><FONT COLOR="BLUE" SIZE=+1>1st</FONT></TD>
    <TD WIDTH=15><IMG SRC="chain.gif"></TD>
    <TD WIDTH=15> </TD>
    <TD WIDTH=60 ALIGN="CENTER" VALIGN="TOP"><FONT COLOR="BLUE" SIZE=+1>2nd</FONT></TD>
    <TD WIDTH=15><IMG SRC="chain.gif"></TD>
    <TD WIDTH=15> </TD>
    <TD WIDTH=60 ALIGN="CENTER" VALIGN="TOP"><FONT COLOR="BLUE" SIZE=+1>3rd</FONT></TD>
    <TD WIDTH=15><IMG SRC="chain.gif"></TD>
    <TD WIDTH=15> </TD>
    <TD WIDTH=60 ALIGN="CENTER" VALIGN="TOP"><FONT COLOR="BLUE" SIZE=+1>4th</FONT></TD>
    <TD WIDTH=15><IMG SRC="chain.gif"></TD>
    <TD WIDTH=15> </TD></TR>
<TR>
    <TD WIDTH=15> </TD>
    <TD WIDTH=60> </TD>
    <TD WIDTH=15><A HREF="idea1.htm"><IMG SRC="chainpul.gif" BORDER=0></TD>
    <TD WIDTH=15> </TD>
    <TD WIDTH=60> </TD>
    <TD WIDTH=15><A HREF="idea2.htm"><IMG SRC="chainpul.gif" BORDER=0></TD>
    <TD WIDTH=15> </TD>
    <TD WIDTH=60> </TD>
    <TD WIDTH=15><A HREF="idea3.htm"><IMG SRC="chainpul.gif" BORDER=0></TD>
    <TD WIDTH=15> </TD>
    <TD WIDTH=60> </TD>
    <TD WIDTH=15><A HREF="idea4.htm"><IMG SRC="chainpul.gif" BORDER=0></TD>
    <TD WIDTH=15> </TD></TR>
<TR>
    <TD WIDTH=15> </TD>
    <TD WIDTH=75 COLSPAN=2 ALIGN="RIGHT" VALIGN="TOP"><FONT COLOR="MAROON">Pull</FONT></TD>
    <TD WIDTH=15> </TD>
    <TD WIDTH=75 COLSPAN=2  ALIGN="RIGHT" VALIGN="TOP"><FONT COLOR="MAROON">Pull</FONT></TD>
    <TD WIDTH=15> </TD>
    <TD WIDTH=75 COLSPAN=2 ALIGN="RIGHT" VALIGN="TOP"><FONT COLOR="MAROON">Pull</FONT></TD>
    <TD WIDTH=15> </TD>
    <TD WIDTH=75 COLSPAN=2 ALIGN="RIGHT" VALIGN="TOP"><FONT COLOR="MAROON">Pull</FONT></TD>
    <TD WIDTH=15> </TD></TR>
<TR>
    <TD HEIGHT=15 COLSPAN=13> </TD></TR>
</TABLE>