 Chapter 10, Solution
 Chapter 10, Solution
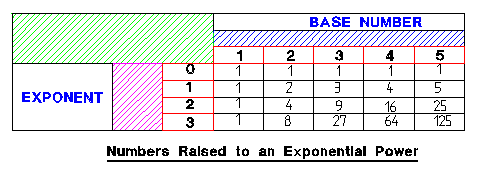
The first step in designing any table that has any spanning or other strange features, is to draw a sketch of it. We actually did this for you, and provided it with the instructions for the exercise. We show it again here:

Next, we'll show you step by step how we built our table, so you can see the logic behind it. Following that, we'll show our HTML source code for the solution, as usual.
Step 1: In the sketch, the top left cell is empty table space, but spans 3 columns and 3 rows; therefore, the we create the first data cell in the first row as an "empty" cell with 'COLSPAN=3' and 'ROWSPAN=3', and make it "empty" by putting nothing between the opening and closing tags.
Step 2: In the sketch, the remainder of the top row is one header cell spanning 5 columns. Therefore, we create a header cell ( in the second row, after the first empty data cell) with 'COLSPAN=5' and place the text "BASE NUMBER" in that header cell.
Step 3: In the sketch, the first three columns of the second row were implicitly specified as empty space by the cell created in step 1. The remainder of the second row is also empty space. Therefore, we create one data cell (in the second table-row) with 'COLSPAN=5' and make it an "empty" cell.
Step 4: In the sketch, the first three columns of the third row were implicitly specified as empty space by the cell created in step 1. The remainder of the third row are five header cells. Therefore, we create five header cells (in the third table-row) and insert the text "1", "2", "3", "4", "5" in the respective cells.
Step 5: In the sketch, the first cell of the fourth row is a header cell and extends downward across four rows. Therefore, we create one header cell (in the fourth table-row) with 'ROWSPAN=4' and place the text "EXPONENT" inside the cell.
Step 6: In the sketch, the second cell of the fourth row is an "empty" cell that extends downward across four rows. Therefore, we create (as the second cell in the fourth row) a data cell with 'ROWSPAN=4' and make it an "empty" cell.
Step 7: In the sketch, the remainder of the fourth row consists of one header cell and five data cells. We create the header cell, and place it after the two cells already in the fourth row. Then we create the five data cells (placing them after the recently created header cell) and insert the respective texts for all cells.
Step 8: In the sketch, the first two columns of the fifth row are implicitly specified by cells already created in steps 5 and 6. Therefore, what remains to be created are the header cell and five data cells. We create that header cell and the five data cells (in the fifth table row) and insert their respective texts (numbers).
Step 9: In the sketch, we see that the six and seventh row are identical to the fifth row, except for the text. We repeat step 8 for the sixth and seventh rows.
Step 10: The instructions specified a table border of 5 pixels, cellpadding of 5 pixels, and cellspacing of 10 pixels; We need to create the border before we test the table, so we can see the cells. Therefore, we place the 'BORDER=5' attribute inside the opening <TABLE> tag. While we're at it, we'll also place the 'CELLPADDING=5' and 'CELLSPACING=0' attributes inside the opening <TABLE> tag.
Step 11: Now we test our table. The sizing and color details may not be right, but we see if the layout works as expected. We make sure all opening tags have a corresponding closing tag, and that no text is placed outside an appropriate tag pair.
Step 12: The instructions asked that the result cells all be sized at 65 pixels wide and 35 pixels high. We only need to specify 'WIDTH' for one cell in each applicable column (the last five columns), and 'HEIGHT' for one cell in each applicable row (the last four rows). Therefore, we modify the opening <TD> tag for those cells only, by adding 'WIDTH=65' to the last five cells in the fourth table-row, and by adding 'HEIGHT=35" to the last cell only in the fourth, fifth, sixth, and seventh table-row. (The last cell in the fourth row will end up with both 'HEIGHT' and 'WIDTH' specified)
Step 13: The instructions asked that the two main headings be "blue", therefore we use the <FONT COLOR="BLUE"> </FONT> tags to enclose the text of those two heading cells.
Step 14: The instructions asked that all cells be explicitly aligned as horizontally and vertically centered. Therefore, we find the opening <TR> tag for each row, and place both the 'ALIGN="CENTER"' and the 'VALIGN="MIDDLE"' attributes inside. Since the second row is empty space, we do not need alignment attributes in that row.
Step 15: The instructions asked for a caption aligned to the bottom of the table. We place the caption after the opening <TABLE> tag, and before the first opening <TR> tag. The instructions also asked that the caption be underlined, so we placed the <U> </U> tags around the caption text but inside the <CAPTION> </CAPTION> tags.
Step 16: The instructions asked that we center-align the table on the screen. We do this by embedding the 'ALIGN="CENTER"' attribute in the opening <TABLE> tag.
Step 17: The instructions asked that the table be colored yellow. To do this, we place the 'BGCOLOR="YELLOW"' attribute inside the opening <TABLE> tag.
Step 18: The instructions asked that the web page be colored aqua. To do this, we place the 'BGCOLOR="AQUA"' attribute inside the opening <BODY> tag.
Step 19: The instructions asked that the table be set to a width of 550 pixels. To comply, we place the 'WIDTH=550' attribute inside the opening <TABLE> tag.
![]()
<HTML>
<HEAD>
<TITLE>Exponential Table </TITLE>
</HEAD>
<BODY BGCOLOR="SILVER">
<CENTER>
<TABLE BORDER=10 CELLPADDING=5 CELLSPACING=0 BGCOLOR="YELLOW" WIDTH=550>
<CAPTION ALIGN="BOTTOM"><U>Numbers Raised to an Exponential Power</U></CAPTION>
<TR ALIGN="CENTER" VALIGN="MIDDLE">
    <TD COLSPAN=3 ROWSPAN=3></TD>
    <TH COLSPAN=5><FONT COLOR="BLUE">BASE NUMBER</FONT></TH></TR>
<TR>
    <TD COLSPAN=5></TD></TR>
<TR ALIGN="CENTER" VALIGN="MIDDLE">
    <TH>1</TH>
    <TH>2</TH>
    <TH>3</TH>
    <TH>4</TH>
    <TH>5</TH></TR>
<TR ALIGN="CENTER" VALIGN="MIDDLE">
    <TH ROWSPAN=4><FONT COLOR="BLUE">EXPONENT</FONT></TH>
    <TD ROWSPAN=4></TD>
    <TH>0</TH>
    <TD WIDTH=65>1</TD>
    <TD WIDTH=65>1</TD>
    <TD WIDTH=65>1</TD>
    <TD WIDTH=65>1</TD>
    <TD WIDTH=65 HEIGHT=35>1</TD></TR>
<TR ALIGN="CENTER" VALIGN="MIDDLE">
    <TH>1</TH>
    <TD>1</TD>
    <TD>2</TD>
    <TD>3</TD>
    <TD>4</TD>
    <TD HEIGHT=35>5</TD></TR>
<TR ALIGN="CENTER" VALIGN="MIDDLE">
    <TH>2</TH>
    <TD>1</TD>
    <TD>4</TD>
    <TD>9</TD>
    <TD>16</TD>
    <TD HEIGHT=35>25</TD></TR>
<TR ALIGN="CENTER" VALIGN="MIDDLE">
    <TH>3</TH>
    <TD>1</TD>
    <TD>8</TD>
    <TD>27</TD>
    <TD>64</TD>
    <TD HEIGHT=35>125</TD></TR>
</TABLE>
</CENTER>
</BODY>
</HTML>
For demonstration purposes, I've provided a link to a file just like what we see above. When your done admiring it, just click the "back" or "previous" button of your browser to return to this page. OK, Let's see it work!