N5ESE's Version of the KA3J UniCounter

(click on any picture to see larger version)
(click on any picture to see larger version)
| NOTE: 'N5FC' is my former call. This project was constructed while that call was valid, and you may observe references to it. |
The last thing I needed was another frequency counter, but when I saw Ron Stone's one-eyed "UniCounter", I just had to have it. At $34 for the kit, it promised to be a bargain, but it was the unique display concept that really hooked me. You see, the frequency is displayed on only one 7-segment LED, which displays the measured result in a sequence starting with the most significant digit. This was weird enough to spark my curiosity, and turns out to work surprising well.
QST Magazine (Dec, 2000) describes the Unicounter in detail.
The UniCounter has an amazing amount of flexibility, for a device based on a single 16F84 PIC microcontroller chip. It can be programmed to do conventional frequency measurements, display all digits or any subset, and calculate an arbitrary offset of your choosing, for use as a frequency display in a heterodyne receiver or transmitter. A unique feature is the ability to program offsets into the VHF range, even though the device can only measure frequencies in the HF range (to 30+ MHz). With this feature, one could measure the frequency of a VFO (under 30 MHz), yet display the post-mixer operating frequency in the VHF range. Neat! Another unique feature is the ability to program 7 non-volatile modes, each defined entirely by the user, and selectable via pushbutton.
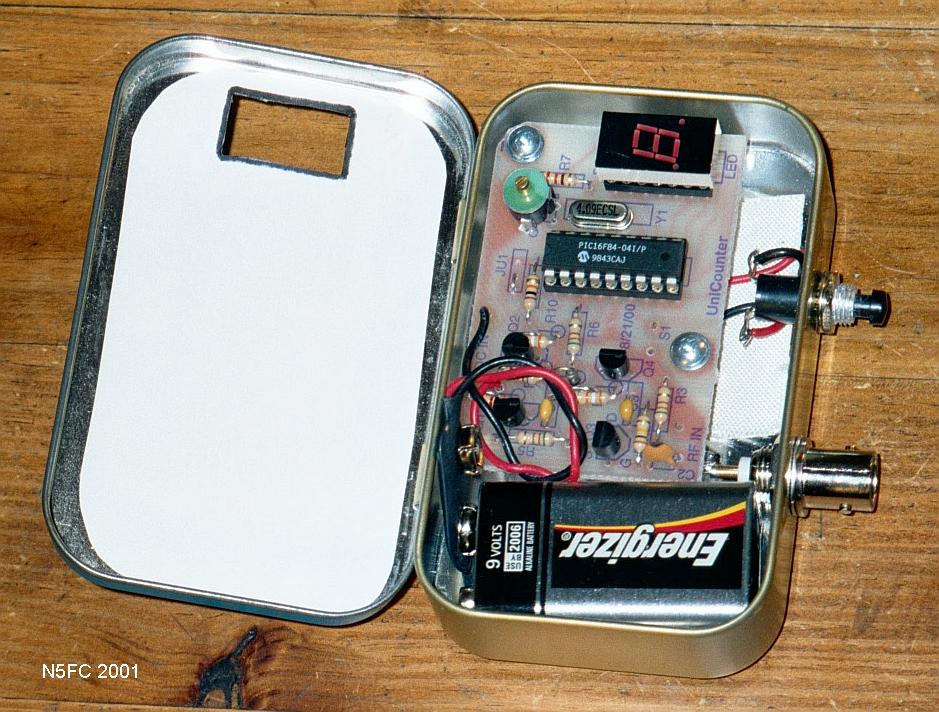
The UniCounter's printed circuit board is small enough to fit easily in an Altoids box, with enough room to house a 9-Volt battery. That's what I did. I used a BNC connector for the input. The pcb assembled in about half-an-hour, and so would make a good beginners project. Putting it inside the Altoids box seemed like the thing to do. It would have been easiest to mount the board inside, and leave it low enough to close the cover, then just open it when needed for measurements. But NOOOooo... I wanted to get fancy and have the display readable with the cover closed. This proved harder than I thought. Ever try to cut a square hole in the thin sheet steel of an Altoids box? I marked and drilled the four corners of the target rectangle with a 1/16" drill. Then, using a nibbler, I attempted to cut the rectangle out. The nibbler jammed frequently on the thin sheet metal, but I was able to complete a somewhat oversized (albeit mangled) hole. I then took sticky-back paper (the kind used for making office labels), and made a lable and a backing, cutting the opening for the display carefully with a hobby knife. This enabled me to cover up my sloppy hole-cutting job, and looks almost like I planned it that way. Here are some pix of the inside, and the label:

(click on either of the above pictures to see larger version)
I programmed mine for three modes. In the first (and default) mode F1, I programmed it for conventional frequency counting, but only to display once per button-push. This allows the UniCounter to re-enter "sleep' mode, saving battery life. [I measured current draw as 18 mA operate, 1.6 mA sleep]. I programmed mode F2 to read the same way, but repeating continuously. For Mode F3, I display only tens-units-tenths-hundredths (example, 7.04132 MHz signal reads 4132), repeating continuously. I can use mode F3 when grading and matching crystals with my Crystal Checker. I left the four other available modes unprogrammed.
Review
This is a cute little instrument, and definitely a conversation piece
Programming is a little cumbersome, if not frustrating. It took me as long to program as to assemble. The instructions are semi-clear. Mind you, the information is all there, but the programming is so complicated with so many opportunities for error, that it's difficult to get through the entire sequence without making a mistake. That said, I don't think I could write the instructions any better, given the flexibility provided and a single pushbutton to do all program entry. Thinking of it that way, it's rather ingenious. When started, the UniCounter goes into it's default frequency-counting mode. Push the button again, and the letters "F" and "P" display, alternately. To program, one hits the pushbutton while the "P" is displayed. To select a frequency-counting mode, one pushes the button while "F" is displayed. During programming, there are several long sequences of characters displayed, in which you press the button when your desired option appears. Believe me, it can take a while to program 7 modes (though you don't have to program more than one). I made lots of mistakes, and had to restart several times.
Once you've accomplished the programming, you have an amazing amount of functionality. You can program F1 (the default mode) any way you want, and with the push of the single button select any of the other frequency-counting 6 modes (assuming you programmed them). You might program one mode for straight-ahead frequency counting, another for grading crystals, and another for displaying QRP rig # 1 frequency (with its unique IF offset), and yet another for QRP rig # 2 (or 3 or 4)... you get the idea.
The UniCounter was not as sensitive as I would have liked, but it was within published specs. I was unable to monitor the frequency of crystals greater than 10 MHz when using my Crystal Checker, while my commercial counter and Arizona Stinger Singer had no problem. Monitoring RF power circuits (drivers, buffered oscillators) was not a problem, however. The measured sensitivity of my unit was as follows:
| Frequency (MHz) | Sensitivity (V-rms) |
| 0.05 | 0.5 |
| 0.1 | 0.06 |
| 0.5 | 0.03 |
| 1 | 0.03 |
| 10 | 0.08 |
| 20 | 0.15 |
| 30 | 0.5 |
In summary, this is one cute little kit, and I think you'll have a lot of fun building and operating it. And besides, its one-eyed operation will surely raise eyebrows at the ham club
73,
Monty N5ESE
dit dididit dit